In this homework, you will be practicing the HTML, CSS, and JavaScript that we learned in lecture.
For Part 1, you will be implementing a Buzzfeed-style personality quiz. Unlike Homework 1, a lot of the HTML and CSS is already implemented for you, but you will still need to make some HTML and CSS modifications to complete the assignment. None of the JavaScript has been implemented for you, other than constants.js that constants the quiz result information.
For Part 2, you will finish a partially-implemented Chrome extension. Unsurprisingly, you will need to use Chrome for this part of the assignment.
Part 3 is optional and can be completed for extra credit. Part 3 involves implementing a second Chrome extension.
Due Date: Mon, Apr 22, 2019 at 11:59pm
Extended Due Date: Mon, Apr 29, 2019 at 11:59pm
- Part 0: Getting started
- Part 1: Personality quiz
index.html - Part 2: Evil extension
- Part 3: OPTIONAL: Twitter gardener
- Submit
Part 0: Getting started
1. Accept the HW2 assignment
- Follow this link, where HW2 is stored on GitHub Classroom.
- Accept the homework and download the starter code as you did in Homework 0.
Part 1: Personality quiz index.html
For Part 1, you will create a personality quiz called “Adopt A Dog And We’ll Reveal A Deep Truth About You.”
We have completed a lot of the HTML and CSS for you already. We expect you will have to make modifications to the following files to complete the assignment:
index.html: Most of the HTML is written for you, but you will likely need to make some modifications for the mobile layout and the JavaScript.style.css: A lot of the CSS is already written for you inprovided-style.css, but you will need to make some modifications for all parts of the assignment. Please make your CSS changes instyle.cssand notprovided-style.css, so that the TAs have an easier time grading.script.js: Write your JavaScript here.
Overall appearance and behavior
The following video shows the look and behavior of the quiz we are asking you to implement.
One detail that is hard to see in the video:
- After the quiz is completed (i.e. after all three questions have been answered), it should not be possible to change your answer anymore.
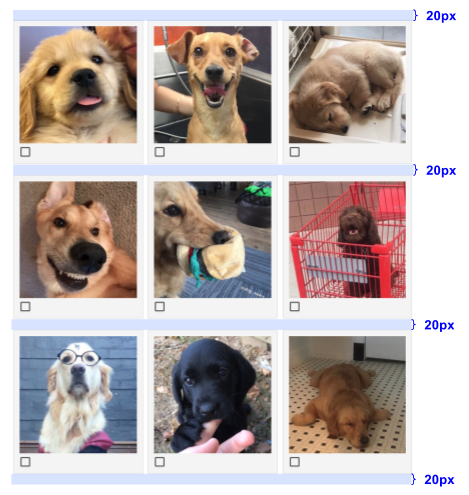
1. Choice grid
Much of the CSS has already been completed for you, but you need to finish styling the answer choice grids.
Choice grid
- You should use a multi-row flexbox to achieve this layout.
- We didn’t talk about multi-row flexbox layout in class, but you can allow flex items to wrap onto the next line (i.e. the second row) by setting
flex-wrap: wrap;onto the flex container.
- We didn’t talk about multi-row flexbox layout in class, but you can allow flex items to wrap onto the next line (i.e. the second row) by setting
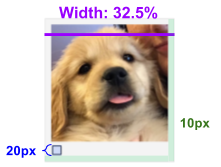
- There is
20pxof space between each row - Each flex item has a width of
32.5%, and each item is spread out with as much space between the other as there can be in the flex container.
Choice: unanswered
- Container
- Background color is
#f4f4f4 - Border is
1pxthick and color is#dcdcdc - Width of the element including the border is
32.5%- Hint: The
box-sizingCSS property might be helpful. See April 12 slides.
- Hint: The
- Space between the border and the content of the element is
10px.
- Background color is
- Choice image (i.e. dog, house, or toy image)
- Hints: We did not tell you the width or height of the image intentionally, as we want you figure out how to get it to behave like this. There are many ways to get the images to “shrink” inside its container
- The tic-tac-toe example has almost the same layout, and fits the X and O images into the invisible
<div>containers. Take a look at the CSS for this example. - The beverage image of HW1 also had similar behavior. Recall what dimensions we gave you for the beverage image.
- You are allowed to modify the HTML if you’d like (but you don’t necessarily have to if you choose a different approach)
- You might also find
:first-childpseudo-selector helpful (but you don’t necessarily have to if you choose a different approach)
- The tic-tac-toe example has almost the same layout, and fits the X and O images into the invisible
- Hints: We did not tell you the width or height of the image intentionally, as we want you figure out how to get it to behave like this. There are many ways to get the images to “shrink” inside its container
- Checkbox
- The unchecked image is
images/unchecked.png - The height and width is of the image is
20px - Note: Do not use an
<input type="checkbox" />for this. Just display the image.
- The unchecked image is
2. Mobile layout
You need to also modify the CSS and HTML if necessary to implement support a mobile view. The video below shows an example of how it should look and behave:
Please see Mar 22 Slides for details on how to implement and test your homework layout in mobile view on your desktop Chrome.
Note: You should not have to load your web page on your phone in order to test this layout. Emulate mobile in Chrome, FireFox, or Safari.
- If the page is viewed on mobile:
- The viewport should be set to zoom-level 100%, and the width should be the device width
- If the device screen size is less than
700pxwide:- The width of the page content should be
95%instead of700px - The yellow circles in the page header should not appear
- The width of the page content should be
- If the device screen size is less than
500pxwide:- Each answer choice should be
49%in width instead of32.5%
- Each answer choice should be
3. Quiz behavior
This web page is a 3-question personality quiz. Write the code necessary to implement the quiz behavior as detailed below.
Even though you will mostly be writing JavaScript for this part, you may need to also update the HTML or CSS in order to implement the behavior as described.
Hint: Aspects of the quiz are quite similar in behavior to the tic-tac-toe.html example discussed in lecture.
Dataset Attributes
Note that you should take advantage of the dataset attributes added to the HTML elements in index.html:
data-choice-id: Maps to which quiz result the choice should “count” for, as defined inconstants.js. See details below for scoring and what to do if there are ties.data-question-id: Maps to the question number: one, two, and three.
You can access these attributes in JavaScript by using:
- element
.dataset.choiceId - element
.dataset.questionId
And you can select these attributes via CSS selectors like the following:
[data-choice-id='blep'][data-question-id='two']
Clicking an answer
When the user clicks an answer choice, the answer choices should update in the following way:
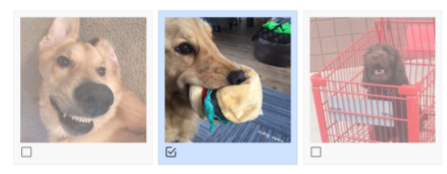
- For the selected item:
- The checkbox image should change from unchecked to checked
- Background color is
#cfe3ff - The checked image is
images/checked.png
- For the unchosen items:
- They should be made semi-transparent by setting their
opacity: 0.6; - Note that only the unchosen items for this question should change style.
- They should be made semi-transparent by setting their
Changing an answer
If the user has not completed the quiz (i.e. there is at least one unanswered question), they should be able to change their answer to a question by clicking a different answer.
After the user has answered every question, the answer choices should lock and it should no longer be possible to change an answer, until the user clicks “Restart quiz” or refreshes the page.
Completing the quiz
After the user has answered all three questions, the quiz is complete.
- It should not be possible to select another answer after you’ve completed the quiz.
- i.e. you click another dog after the quiz is complete, nothing on the page should change.
- The page should remain in this “completed” state until the user refreshes the page or clicks “Restart quiz”.
The personality results should appear at the bottom of the page, with the personality data that corresponds to the dog, as defined by constants.js.
Here is the description of how the personality results should look:
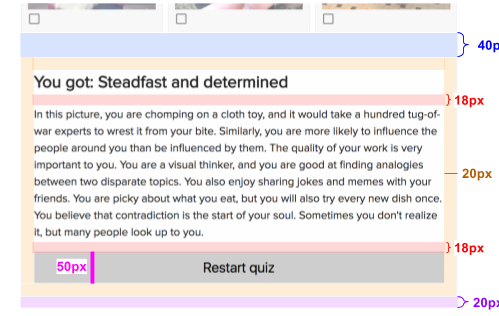
- Result button
- Background color is
#cecece - On hover, the color should change to
#e0e0e0
- Background color is
Scoring the quiz
The data-choice-id for each answer choice maps to the key name for each possible result in RESULTS_MAP, stored in constants.js. You can access RESULTS_MAP in script.js because constants.js is included before script.js in index.html.
When the quiz is complete, you can score the quiz by tallying the data-choice-ids from each answer. For example, if a user chooses blepdog.jpg, sleepybed.jpg, and bleptoy.jpg, you should show the title and contents from RESULTS_MAP['blep'].
If there is a tie, i.e. if someone chooses all unique data-choice-ids, the answer to the first question should win. For example, if a user chooses burgerdog.jpg, nerdbed.jpg, and shydog.jpg, you should show the title and contents from RESULTS_MAP['burger'].
Resetting the quiz
If the user clicks the “Restart quiz” button, the page should reset to its original state.
- The answer choices should return to their original appearance before the quiz was complete
- The personality resuelement.scrollIntoView(); to do this. See mdn for more details.
constants.js
- This file contains the definition of the object
RESULTS_MAP, which maps the dog type to its result title and description. - Because this variable is declared in the global scope, you can access this variable in
script.js. - You should not have to modify this file to solve the homework.
script.js
- This is the file in which we expect you to implement the quiz behavior.
- You should define and attach event listeners in this file.
Image to personality mapping
The RESULTS_MAP is defined in constants.js and the images are saved in the images/ directory.
blep{dog,bed,toy}.jpgcorresponds toblepinRESULTS_MAPhappy{dog,bed,toy}.jpgcorresponds tohappyinRESULTS_MAPsleeping{dog,bed,toy}.jpgcorresponds tosleepinginRESULTS_MAPdopey{dog,bed,toy}.jpgcorresponds todopeyinRESULTS_MAPburger{dog,bed,toy}.jpgcorresponds toburgerinRESULTS_MAPcart{dog,bed,toy}.jpgcorresponds tocartinRESULTS_MAPnerd{dog,bed,toy}.jpgcorresponds tonerdinRESULTS_MAPshy{dog,bed,toy}.jpgcorresponds toshyinRESULTS_MAPsleepy{dog,bed,toy}.jpgcorresponds tosleepyinRESULTS_MAP
NOTE: To make this easier to test, the items for each question are in the order displayed above, i.e. the first answer of every question maps to blep, the second answer of every question maps to happy, etc. You should not rely on this ordering for your homework solution. Instead, use the dataset attributes as described at the top of this section.
Part 2: Evil extension
The next two parts of the assignment involve writing Chrome extensions.
The first extension is called “Evil extension.” When you install it, all instances of “there”, “their”, and “they’re” on the page are changed to the wrong spelling in the following way:
- “there” changes to “their”
- “their” changes to “there”
- “they’re” also changes to “there”
This mapping (along with a few case-related variations) is stored in the MATCH_LIST object at the top of the file. Use this mapping to complete the extension.
1. Install Chrome
This is the only assignment in the quarter where you must use Chrome. Please download and install Chrome if you haven’t already.
2. Install the Evil Extension
The HW2 starter code comes with the starter code for the Evil Extension.
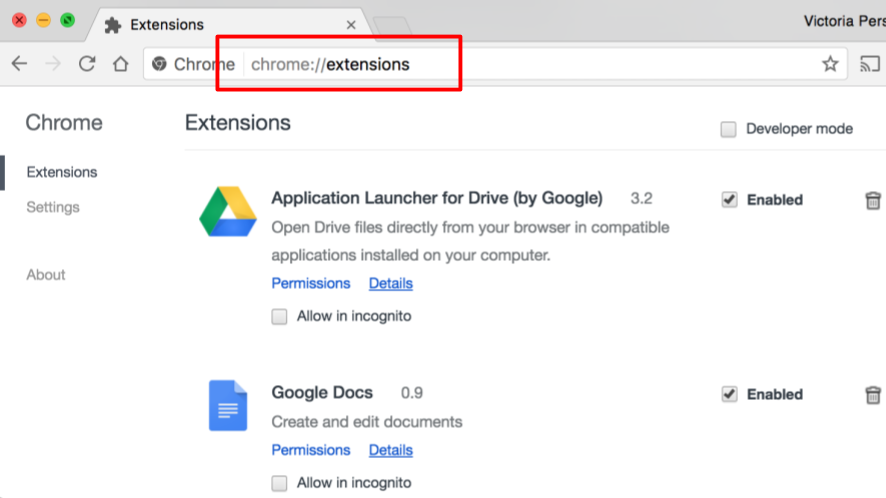
Open chrome://extensions
In the URL bar, type in chrome://extensions and hit enter. This will bring you to Chrome’s extensions settings page.
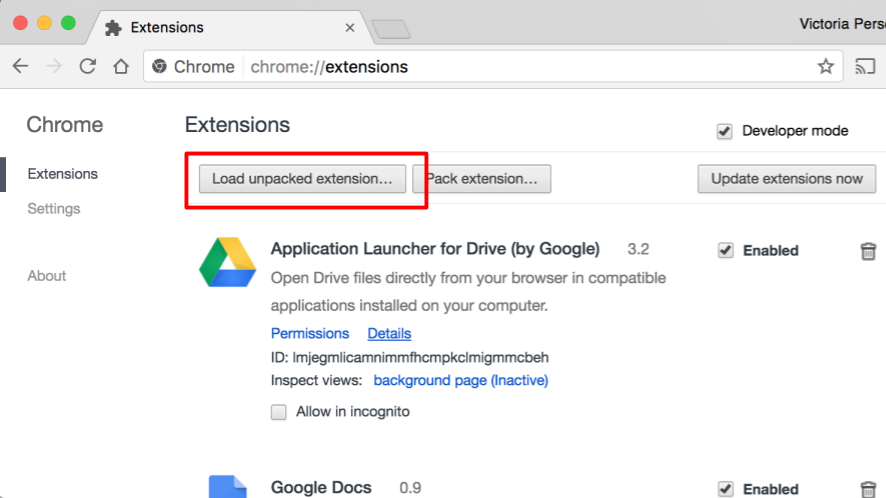
Check “Developer mode”
In the upper right corner, there is a check box that says “Developer mode.” Check this box.

Click “Load unpacked extension”
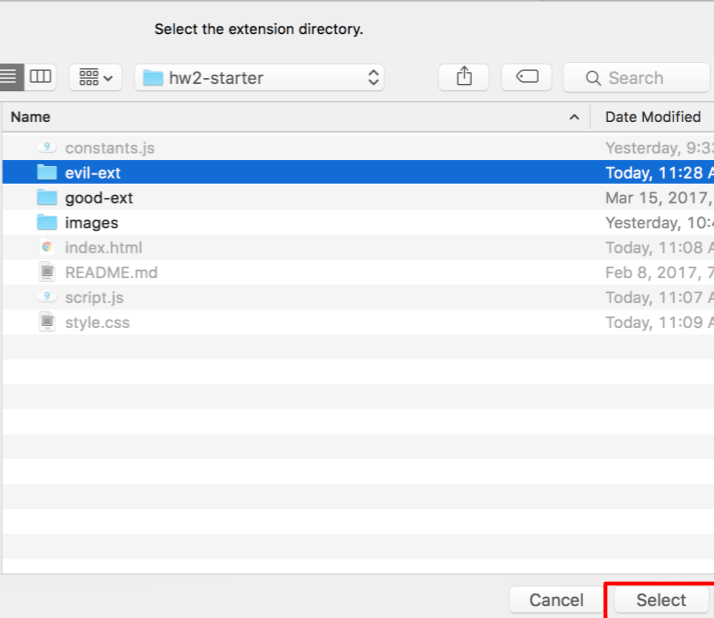
Navigate to the “evil-extension” directory”
In the file chooser window that pops up, you should navigate to the evil-extension directory included in the starter code.
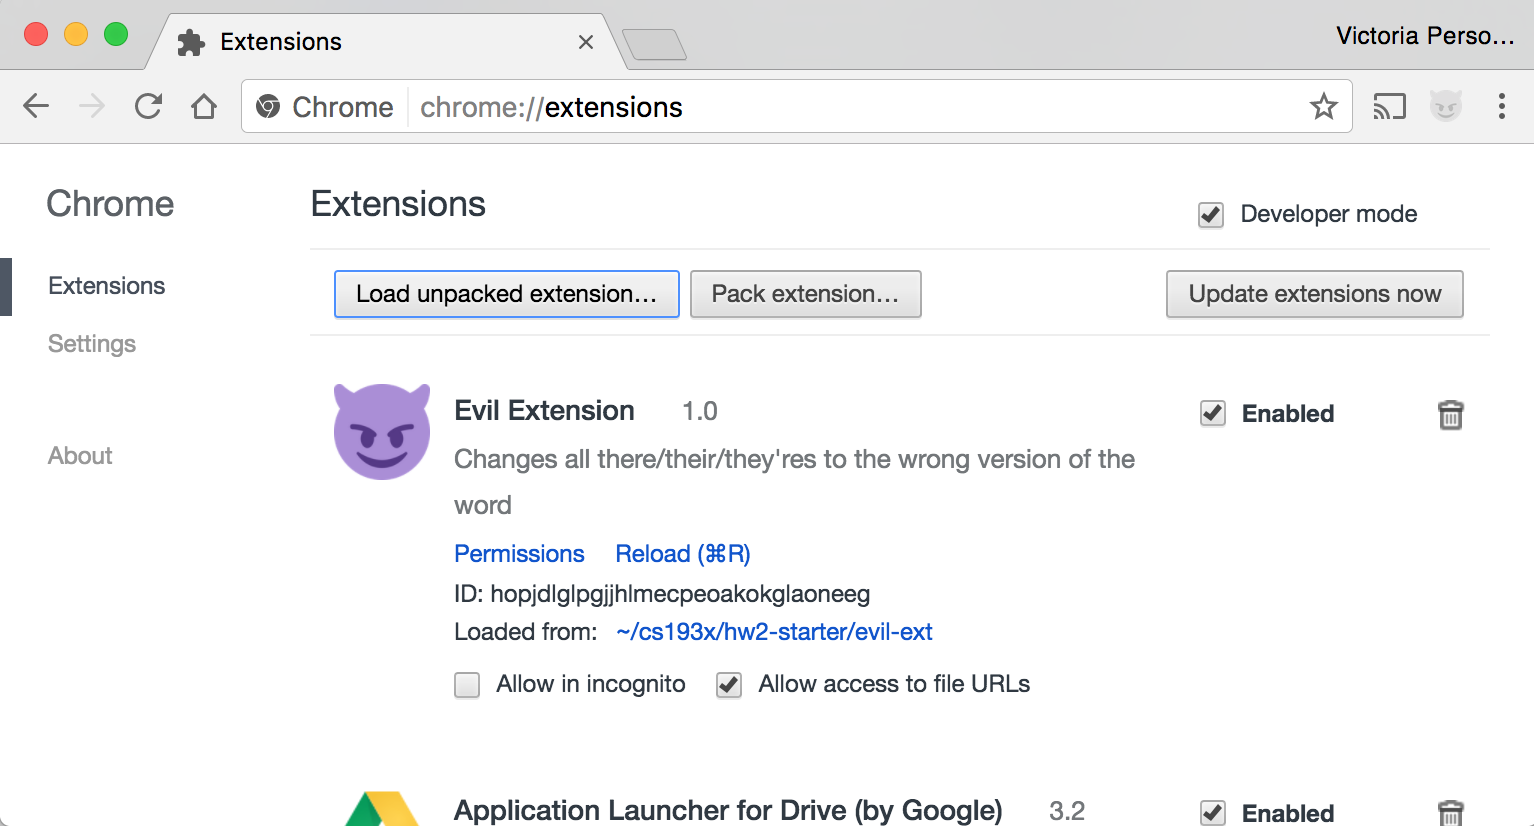
You should now see the Evil Extension in the list of extensions.
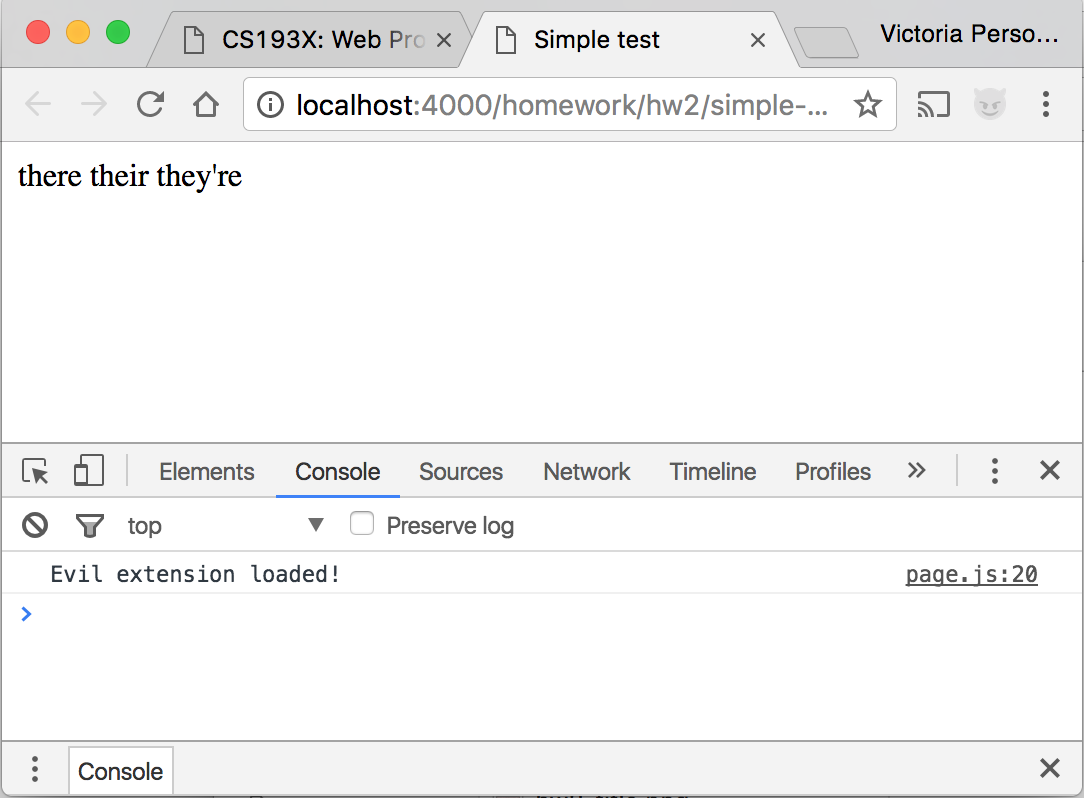
3. Verify Evil Extension is loaded
The Evil Extension contains a print statement in page.js. Because this is a Chrome extension, this print statement will not show up in the usual Web Console. The following steps will show you how to view this print statement.
Navigate to a test file
You can actually do this from any page, but we’re using a test file for simplicity.
Open the following link in a new tab:
Open the Web Console
On the simple-test page, open the Web Console. You should see the debug print statement:
Make a change to page.js
Every time you make a change to the extension, you will need to refresh the chrome://extensions page.
Try making a change and verify it shows up in the console:
- Add a second
console.logstatement at the bottom ofpage.js, such asconsole.log('Extension updated'); - Navigate to chrome://extensions in a new tab, and either click “Reload” or press command-R (ctrl-R on Windows)
- Navigate to simple-test.html and view the Web Console.
You should see your second print statement in the Web Console:

Debugging the script
You will probably want to debug your extension’s JavaScript using the Chrome Debugger. You can find the JavaScript files from this extension by navigating to:
- Sources -> Content Scripts -> Top -> Evil Extension -> page.js
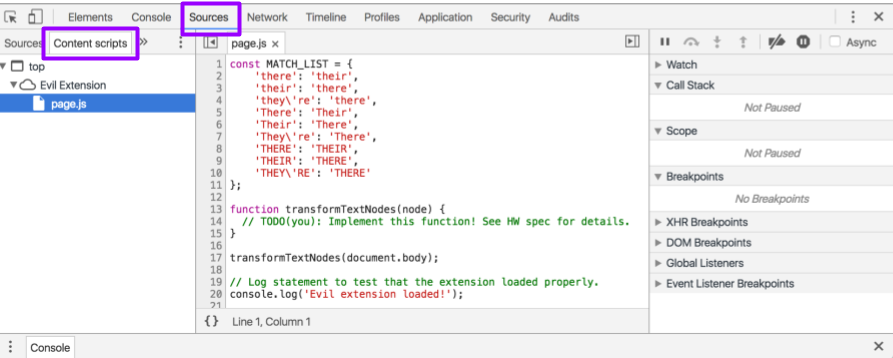
You can then set breakpoints in this view.
4. Implement transformTextNodes
The transformTextNodes function should recursively walk the DOM tree and modify the textContents of each text node that contains a “there”, “their”, or “they’re” as necessary:
- “there” changes to “their”
- “their” changes to “there”
- “they’re” also changes to “there”
These rules (along with a few case shifts) are contained by MATCH_LIST.
The transformTextNodes function takes a DOM node reference as a parameter. At the bottom of page.js, there’s an initial call to the function: transformTextNodes(document.body). You should not have to change this function call.
Limitations:
It is OK if your extension has the following limitations:
- Your transformation only has to work on the variants of “there” as defined in
MATCH_LIST. For example, your function does not have to changethEREorThEy'Re. - Your transformation only has to work on exactly matches to
MATCH_LISTand not substring matches. For example, For example, your function does not have to change instances of “there” with punctuation, like"There," she said.or words where “there” is a substring like “therefore”
Note: You may not use the TreeWalker JavaScript API to solve this, only because we want you to get a deeper understanding of the DOM through walking the tree manually. However, if you were implementing something like this outside of 193X, you should use TreeWalker instead of manually walking the tree.
Helpful Node properties
- These are also defined in the Apr 21 slides:
Hint: Skip SCRIPT and STYLE elements
- You should not examine the
textContentof<script>and<style>tags, as this might affect the JavaScript / CSS of a web page if that page is embedding JavaScript or CSS directly in the HTML via those tags.
Hint: String manipulation
- You may need to use JavaScript string methods that we did not cover in class. You can see the MDN string reference for the complete list of operations. Particularly
split,join, andtrimmay be helpful.
Implementation hints
- The Apr 21 coding examples include
dom-walk-script.js, which may be useful to you. This example both:- Recursively walks the entire DOM
- Finds the
Textnodes of the tree and prints them out
- As explained at the end of the Apr 21 slides, all text content of an HTML page is contained in a
Textnode. These text nodes are always leafs in the tree.- Here’s an interactive example of the nodes within the DOM
- The
textContentproperty of each DOM Node represents the text content of the node itself along with the text content of any descendants (mdn).textContentis both a readable and writeable property- You can view the text content of an element and its descendants like
console.log(element.textContent); - You can modify the text content of an element and its descendants by assigning the property to a new value, like
element.textContent = 'hello'; - If you edit the
textContentof any element that’s not aTextnode, you may strip inline tags: See this example - Therefore if you are trying to write an extension to manipulate text (such as for Part 2 of this assignment), you must operate on the
textContentof Text nodes, and not thetextContentof Element nodes
- You can view the text content of an element and its descendants like
5. Evil Extension test files
You should verify your Evil Extension works on the following files:
Part 3: OPTIONAL: Twitter gardener
This part is entirely optional and can be completed for extra credit.
Here is a video of the Twitter Gardener behavior:
When the user clicks “Start Gardening”, the tweets on a Twitter feed are highlighted on hover. When you click a tweet, the text contents of the tweet are replaced with a positive affirmation.
1. Install the Twitter gardener extension
You can install the extension in the same way you installed the Evil extension.
2. Implement page.js
The popup.html and popup.js file are already fully implemented and do not need to be modified.
You should implement the onMessage function in page.js, as well as any helpers. This function is called when you click the “Start Gardening” or “Stop Gardening”. The gardeningInProgress parameter is true if the user has just clicked Start Gardening and false if the user has just clicked Stop Gardening.
Styling, selecting, and adding event listeners to tweets
- Your extension will be dependent on the CSS classes Twitter set on its website.
- Inspect the elements of a Twitter page to see what CSS selector you need to select all tweets.
Cursor
- When you hover over a tweet, you should change the cursor to
images/rose-cursor.gif- In order to access an image packed in a Chrome extension, you need to use
chrome.runtime.getURL, e.g.:
const url = chrome.runtime.getURL('images/rose-cursor.gif');` - To set a cursor style, you can use the CSS property
cursor, e.g.:
someElement.style.cursor = 'url(' + url + ') 4 12, auto'; - To unset a cursor style, set the style to the empty string, e.g.:
someElement.style.cursor = '';
- In order to access an image packed in a Chrome extension, you need to use
Background
- When you hover over a tweet, the background of the tweet should change to
images/sparkle.gif- In order to access an image packed in a Chrome extension, you need to use
chrome.runtime.getURL, e.g.:
const url = chrome.runtime.getURL('images/sparkle.gif');` - You should also set the opacity to
0.8.
- In order to access an image packed in a Chrome extension, you need to use
Clicking a tweet
- When you click on a tweet, the text contents of the tweet should change to a random positive affirmation.
- Normally clicking on a link causes the tweet to expand, so you need to stop this behavior. You can do this with
event.stopPropagation();, whereeventis theEventparameter name mdn. - The text contents of quoted tweets should change to a random positive affirmation as well.
- Normally clicking on a link causes the tweet to expand, so you need to stop this behavior. You can do this with
- The positive affirmations are stored in the
POSITIVE_MESSAGESlist.- You can select a random index of
POSITIVE_MESSAGESby using the following JavaScript:
Math.floor(Math.random() * POSITIVE_MESSAGES.length);` - You can add your own positive affirmations to the array if you wish!
- You can select a random index of
- The affirmations do not persist after refresh.
Submit
Upload your completed homework to your GitHub repository and publish them, in the same way that you did with Homework 0.